Which Came First, The Chicken or the Egg?

side-by-side incubator and brooder
This setup has an incubator and a brooder side by side. It’s not a bad system for just a handful of chicks.

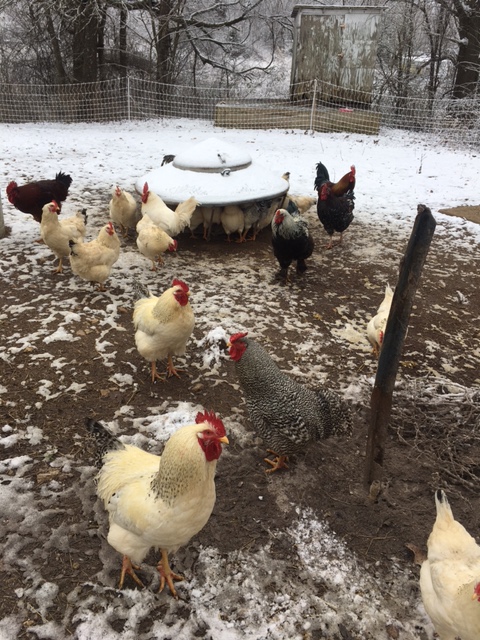
On my homestead, the answer to that question was the chicken. However, hatching eggs is part of the perpetual equation. On July 9, 2020, my chicks arrived from The Cackle Hatchery of Lebanon, Missouri. I chose The Cackle Hatchery because I listened to some advice Dad gave me some advice about purchasing chickens when I was growing up. He said to always buy my chickens from the reputable hatchery nearest my home. This way the chicks don’t have far to travel and will have less stress on them. I found that to be true. Out of the 50 chickens that I ordered, I received 55. Of that 55, I had 53 survive to adulthood. I have butchered (with help) a few of the roosters (with more to harvest) and still have a large flock. This past week we added five more.

On December 21, 2020, the shortest day of the year, my hens started laying their first eggs. From then on, all winter, the hens have been laying like it was summer.

On February first, just before the coldest weather so far this winter (and hopefully the coldest overall) I started incubating eggs. To incubate eggs, of course, I needed fertile eggs. Hens can lay eggs without a rooster, but they cannot get fertilized eggs without one. Because I had my chickens and oodles of roosters with them, I am certain that I had fertilized eggs.

I chose other criteria for the eggs I chose. One criterion is that I needed eggs that were as clean as possible. I chose the cleanest because eggs have a natural coating on them that protects the embryos in the egg from bacteria so I don’t want to wash them.

Also I like to choose eggs that are as round as possible. According to my Dad, his mother used to do this and 80% of the eggs that hatched were hens. I don’t know how true this will be for me, but I believe it is an experiment worth trying.

 For what should be obvious reasons, I didn’t refrigerate the eggs I used for hatching.  However, I needed to keep the eggs more than 24 hours before incubating, and I turned them from side to side every twelve hours until I was able to get them into the incubator. This will keep the yolk from being stuck to one side for too long. I also made sure the eggs were stored pointed end down. The pointed end should be down at all times during storage and also while in the incubator. The reason is that the chick inside will need the air pocket that is on the rounded side.

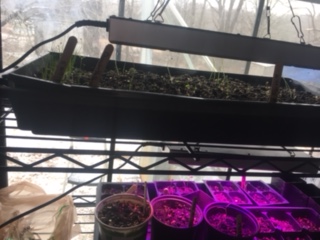
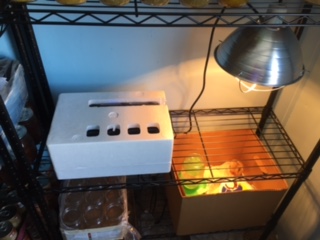
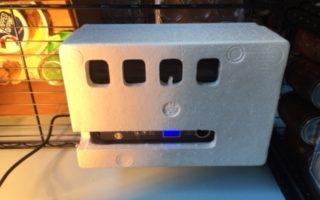
In the past, I had an incubator that did not have an egg turner with it. I had a large mortality rate with the chicks because I had to manually turn them and sometimes, I would forget.  I set up the incubator in a quiet location and then plugged it in, ready for the eggs, but I ran my incubator for a few days to make certain that everything was working properly. I kept tabs on my humidity levels and be certain that the humidity levels don’t go below 50%. Next, I put the eggs in the incubator pointed end down. I put an “x” on one side and an “o” on the other so that as it turns automatically, I’d be able to tell if the turner was working properly. I kept this up until the eggs had been incubated for 18 days. Also, I checked humidity and temperature levels daily.

Candling

On day eight, I carefully took out each egg and used the candling light on the incubator in a dark room to check to see if a chicken embryo was growing. If I saw a large mass inside the egg, it meant that an embryo was growing if I saw air pockets through the egg, there was no embryo, and I discarded that egg. Also, I removed any broken or cracked eggs.

Hatching

chick in incubator
Chick recently hatched and still in the incubator.

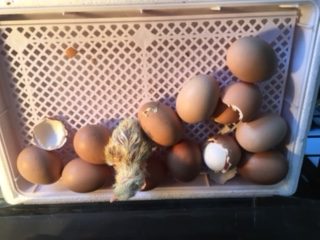
On day 18, I stopped turning the eggs and around day 21 I started hearing some peeping inside the eggs.  However, I knew that I did not want to open the incubator anymore for any reason. I didn’t lift the incubator hood because I didn’t want to get any cold air or any bacteria in it and I didn’t want to bother the chick either.

I left the chicks alone and knew not to try to help the chick peck its way out of the shell. I knew that it won’t survive if I did. In some cases, hours pass before a chick busts through its egg completely. I allowed them to dry completely before I put them in the brooder box.

I wasn’t worried about keeping the chicks in the incubator too long, especially since the weather had been so cold lately. Chicks can remain in the incubator for up to 48 hours. I, however, kept them in there only about 24 hours after hatching.
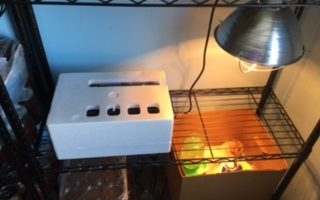
Brooding

chicks in brooder
A mason jar waterer and a homemade feeder and a heat lamp create a comfy environment for these chicks.

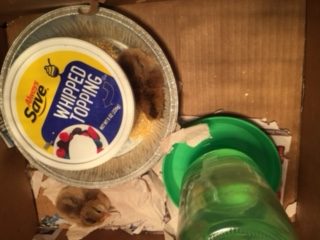
On day 18, I set up the brooder in a packing box next to the incubator. I put several layers of newspaper at the bottom of the box and set up a heat lamp. I filled the chick waterer and had it at room temperature before moving chicks into the box. I also filled the feeder with food in it ready for the chicks.

Yes, five chicks hatched from this first batch. The youngest didn’t hatch out until day 24 and unfortunately he did not survive. This first batch I am keeping for our use, but from here on out, I hope to hatch chicks to sell as well.

I have the second batch of eggs in the incubator right now. My ability to raise chickens perpetually has now been made possible.

the incubator
Now that the first batch has been removed, the incubator has been fumigated and the second batch started.

The Perpetual Homestead Series

As mentioned in my first post Becoming a Perpetual Homesteader, one of the books that I will be writing for The Perpetual Homesteader series is The Perpetual Chicken House. Feel free to ask any questions because I would love to help! Ask your questions in the comments below.

Planting Tomato Seeds on a Snowy Day

Tomato plants in the womb
Grow tomatoes from seed for better selection and cost savings.

The cold and snow from the past few days has got me thinking even more about starting my garden. I have a lot of other things that I would like to do. For instance, I have to get my fruit trees in their permanent locations, and I have perennial plants that need to be put in the ground as well however, with more than six inches of snow still on the ground, those projects will have to wait until the snow is melted. That should be happening this coming week, but until then, planting indoors seems to be on the agenda.

I am Wanting Lots and Lots of Tomatoes

That’s why I am planting tomatoes from seed. Tomatoes are very versatile. Tomatoes can be eaten raw in salads, on sandwiches and just eaten right off the vine. They can be canned into tomato sauce, tomato juice, tomato paste, salsa, with peppers and onions, and plain canned tomatoes. Green, tomatoes can be made into relishes and pickles.  I never seem to be able to grow enough tomatoes.

Last year, planted several varieties of tomatoes from seed and bought some others as plants. The plants I purchased had thick stems and were about 8-10 inches tall. Because I had moved to my new location, many of the taller plants that I had grown from seed had died and all I had were small tomato plants that were only a couple inches tall. I thought that there was no way that they would ever grow. However, they did. Actually, what surprised me was that the small tomato plants took off in my garden almost immediately whereas the taller, store-bought plants did not do as well, and the homegrown plants actually overtook the other ones.

 I didn’t do as well with my tomatoes as I would have liked, but this year I plan to do a better job with them. More on that later when I plant them in the garden. For now, though, let’s go over planting seeds for growing transplants.

What Tomato Seeds to Plant

Planting tomato transplants from seeds to plant in my garden later will save me money and lets me choose varieties that are not often found at plant nurseries.  Because I save seeds from tomato plants that I grew last year, I use only heirloom or open pollinated seeds. This way the tomatoes that I grow will grow true to the variety. I have several types of tomatoes that I will be growing this year. This first batch of tomatoes is the Beefsteak variety. This variety is an indeterminant which means that the plant will grow and produce throughout the season.

Preparing the Soil

Next, I mixed my soil. My soil mix is primarily garden soil and vermiculite. The reason I am using the vermiculite was because a friend gave it to me, and I never like wasting anything.

I put this soil into growing trays or small containers: Recycled or biodegradable trays are best. I use a plastic recycled planting tray and place recycled pots inside them. Later I will transplant the plants into individual containers so that I simply place the whole thing into the soil. As an alternative, you can use an egg carton. For the later transplants, I like using Dixie cups.

Some people like to use a glass or metal spray bottle for watering the seeds, but you can repurpose an empty household bottle. Just make sure to pick one that never contained harsh chemicals, as the residue can damage your delicate plants. I personally use a one cup measuring cup and pour small amounts of water over the soil after planting.

Popsicle sticks make handy plant markers and that is what I am using here. These markers are like name tags for your plants, which comes in handy when you’re planting different varieties. Of course, if you’re only planting one type of seed, they’re not necessary. I have a supply of them so I will definitely be using them.

Putting Seeds in the Soil

I start my tomato seeds 6-8 weeks before the last frost date indoors. Doing so allows my plants to go through the whole germination and into the growth process and be ready to bear fruit when warm weather arrives. If you’re planning to keep your tomato plants indoors or in a greenhouse, this is not an issue, so you can start any time.

I placed 2-3 seeds per container to make up for any that may not germinate. I spaced them with equal distance between each other.

I then sprinkled a little extra potting soil on top of the seeds and gently patted the surface to make it smooth.

Next, I sprayed my seeds using my spray bottle until the soil is moist but not soaked. This requires about 4-5 squirts. Once my seeds turn into plants, I’ll be able to use a small watering can.

 I mark one of the popsicle sticks and write the names of the tomato varieties on the stick and note the dated sown on my gardening calendar.

Finally, I cover the planting tray with the plastic and place them onto the growing shelf.

Germination

Tomatoes love warmth, so I placed the planting containers in the sunny window in my living room. During the germination process, I will keep the tomatoes warm and moist. That is why I cover the plants with plastic to ensure the soil stays moist and the seeds stay warm. Keep lights above and a heat mat under tomatoes until they germinated.

Grow lights are highly recommended. Because the lights can be placed only a couple of inches above the seedlings, it prevents the leggedness (long, skinny stems caused from insufficient sunlight of a window). The lights help tomatoes develop stockier stems and bushy leaves.

In addition to lights, rotating my plants so that they get equal amounts of sunlight will prevent them from leaning in one direction.

Growing the Seedlings

When the first true leaves appear, gently brush I’ll gently brush my hands over their leaves a few times per day. This action simulates wind and helps to strengthen the plant’s stems. (If you smoke, be sure to wash your hands before doing this as tobacco mosaic can disease your tomatoes.)

Once your tomato plants have at least three or four sets of true leaves, they’re ready to be hardened off. More about planting tomatoes in the garden later. I will probably be transplanting these tomatoes into larger containers before putting them permanently in the garden, however because this way I can develop a better root system before planting outdoors.

I planted eight varieties of herbs this week too. More about herbs later! I hope you’re having a good week! Do you plant your own seeds for transplants? I would love to hear about it!

As the Snow Flies–Planting Early Indoors

Right now, as I am writing this in the middle of a Sunday afternoon, I am sitting here watching the snow fall. Just because it is cold and snowy, doesn’t mean that now’s not the time to begin preparing for this year’s garden. I have started a number of projects. Here is what I have done so far this winter.

Sweet Potatoes

sweet potato plants on a snowy day
By the time they are ready to plant, these sweet potato plants are going to be producing a massive number of sweet potato slips.

I mentioned in my previous post that I am raising sweet potatoes from roots of last year’s sweet potatoes. Sweet potatoes are tropical, perennial vines that may have originated in India, although until recently, scientists thought sweet potatoes were a South American native. The plants produce edible leaves as well as tubers.

Last year when I started the original plants, I planted a single sweet potato just after Thanksgiving in soil in a pot and kept it watered. I had to wait patiently for several weeks before the first leaves showed above the surface. From the plants that grew, I secured several slips (plants with leaves and roots) and planted them in an area of the garden.

Because my garden was just starting, and I didn’t have a bed ready to plant them, I piled a bunch of leaves in a ditch where it had good sunlight and then topped them off with soil I found in an old tractor tire. I then planted the four surviving sweet potato slips in the new bed. I wasn’t sure what to expect, I kept it watered and somewhat weeded. The plants started growing slow, but as the weather heated up, the plants not only took over the bed, but took over the lawn around it. Because I couldn’t mow the lawn around the sweet potatoes, I piled grass clippings around the plants though this didn’t keep all weeds down, having the mulch there did make it easier to pull the weeds that did come up.  

I harvested before the first frost of the year. I harvested about twenty-five pounds of potatoes.

After harvesting the sweet potatoes, I harvested the roots. Because sweet potatoes are perennials, the roots, if kept from freezing will produce the next year. I planted them in a long low recycled planting container. As you can see, here it is January and I have a good start on these plants.

Onions

Early onion starts
Onions under grow lights on a snowy February afternoon.

Though I will be planting onion sets in the garden, I planted onions from seeds. I will be putting them in the ground about the same time I put the onion sets into the ground as well. One advantage to growing from seed is that I can plant different types of onions and do it at a lower cost than with onion sets.

Chives

Chives belong to the onion family and can be sown directly outdoors in a garden bed, but if you’d like to get a head start, start seeds indoors 8-10 weeks before the last spring frost.

Cabbages and Broccoli

Cabbage and broccoli are such close relatives that they can be planted in the same way for transplanting. Sow two cabbage seeds about ½ inch apart and ¼ inch deep in each cell. Spritz the soil surface with water from a plastic spray bottle to evenly moisten the surface. Do not water enough to make the soil soggy or wet. Close the flat up in a clear plastic bag. Poke a few holes in it with a toothpick to allow for proper air circulation. Set it in a warm, brightly lit room out of direct sun. The top of your refrigerator or above a hot water heater are ideal locations. Your cabbage seeds will sprout in about three to four days if the soil temperature remains between 80 to 85 F. Cooler soil temperatures may slow germination time to as long as two weeks.

Check the soil every day to make sure it never dries out. Spritz with water as necessary to keep the soil surface evenly moist but not soggy or wet.

Feed the seedlings a water-soluble 15-30-15 houseplant fertilizer about three days after germination. Dilute the product to half-strength. Repeat applications every two weeks. Follow the packaging instructions.

Cut the weakest seedling in each cell off at the soil line with clean, sharp scissors when the plants each develop one set of true leaves.

Harden seedlings off one week prior to planting in the garden. Set them in the shade during the first two or three days and bring them in at night. Place the seedlings in a sunny spot during morning hours for the next three or four days. Move them to shade during afternoons and bring them in at night for the next few days. Allow them to spend all day in the sun and bring them indoors overnight for several days. Set them outside for good thereafter.

Peppers

pepper starts getting a headstart
Peppers and herbs growing under grow lights.

I sowed my pepper seeds 10-12 weeks prior to transplanting. I planted them ¼” deep in a fine-textured soil mixed with vermiculite to provide good drainage. I planted two kinds of hot peppers and two kinds of sweet peppers. I made sure that I had each one carefully labeled because I would hate to mix them up. Because they are growing in my living room window, I didn’t worry that the bottom heat needed to be between 80–90°F/27–32°C. Seeds will germinate in 7–8 days at that temperature; at lower temps, germination is slower, erratic, and percentage germination is reduced.

In about 2 weeks, when the first true leaves begin to form, carefully separate the seedlings and transplant them into cell trays or pots.

Pepper seedlings should be grown for 10-12 weeks before being transplanted outdoors.

Egg Plant

Growing eggplants in containers will allow you to grow these veggies earlier since the soil in containers warms up faster. Growing in containers will also help you deal with weeds and pests conveniently. In fact, these troubles are less likely to bug you when growing eggplants in containers.

I started the eggplant seeds indoors. I filled the pot with vermiculite and soil and planted the seeds so that I could thin them later. Eggplant seeds will germinate in about ten days and will be ready for transplanting in 6 to 8 weeks.

Other Herbs to Begin Early

Some plants are slow germinating but do best when they are first treated with cold for 30-90 days. I start these seeds by putting some vermiculite in a plastic bag and dampened with water and then putting the bags in the freezer for one to three months. Afterwards, I bring the seeds back up to room temperature and plant as recommended. Here are the herbs that I treated with this method. These are parsley, lavender, echinacea, and true comfrey

In addition, other herbs, particularly perennials need more time to get started so that they can be planted later out in the garden with better results. These are hyssop, oregano, and Russian tarragon-I used the same vermiculite and soil mix that I used for the other seeds. Because the seeds were so small, I just pressed them into the soil and watered as usual.

Why I Am Not Using a Tiller

Last week, I said that I would tell you why I am using a broad fork rather than tilling. There are two basic reasons. The first one is that it enables me to dig out the Bermuda grass that invaded the garden. The second reason is because I don’t turn the soil with the broad fork. The tiller destroys tilth and causes hard pan to develop below the ground that is turned. Instead, it simply loosens and aerates the soil which is especially good to do with clay soil like I have.  

If you enjoyed my post, I would love to hear what you think of this post! If you have any questions about growing transplants from seeds, please feel free to ask them down in the comments below.

The Homestead Today

winter time garden
It doesn’t look like much, but this is where next year’s main garden will be planted.

I learned. a while back, that in order get where I want to go, I first have to know where I am.  So today, I would like to share where I am right now on my homestead.

Today the ground is covered with snow, but a lot is sitting under that snow on this one and a half acre piece of ground.

My Writing

The books that I am writing will be based on my actual experience, not just on a bunch of research. This year has been about foundational preparations. A lot has happened since my last post in June. Here are a few of the highlights. Currently I am working on the first book of The Perpetual Homesteader, The Perpetual Vegetable Gardener and I am working on a couple of smaller books that I plan to share for free as e-books. These books will be called The Seasonal Garden and The Ultimate Survival Garden. I doubt I will be able to publish The Perpetual Vegetable Gardener until later this year, but considering how things are going in this country right now, I want to get the two smaller books into the hands of as many people as possible and before the spring planting season.

The Garden

In September I planted elephant garlic, regular hard stem garlic and Russet potatoes in preparation for next year. The garlic will definitely produce. The potatoes? They are an experiment. In the spring I am going to plant another planting of the same. I’ll show the comparisons in how they grow as the season progresses.

I also have sweet potato slips started from roots saved from last year’s crop from which I got about twenty-five pounds.

I am not using a rototiller but am using a broad fork to dig up the garden. Part of the reason is that I want to see if I can produce a majority of my own food using only hand tools. I’ll explain more about why I am using this tool in my next post.

The Chickens

Chickens in winter
The chickens are making the most of their home this winter

I ordered my chickens last spring, but they didn’t arrive until July eighth. We moved them out to their outdoor pen when they were four days old. Within three weeks we put up a portable electric fence. This made it possible to raise most of them to adulthood even though foxes lived just outside the fence. Feeding the foxes helped too. The hens started laying December twenty-first, the shortest day of the year. I am thinking that I will be sure to get replacement chickens at different times of the year now that I have fresh eggs every day. I have a dozen eggs in the incubator right now. We’ll see how they do.

The Perennials

Not much to see here. I just transplanted some June bearing strawberries last fall. I hope to have some strawberries from them this year. I also ordered some other perennials and other berries including everbearing Ozark Beauty strawberries. They should be arriving later today (2/8/2021).

The Herb Gardens

Medicinal Garden in the Wintertime
Not much to see here, but this will have a variety of plants come spring.

Here’s the beginnings of the medicinal herb garden. I have a few echinacea plants and a few lavender plants. What you see are the kale plants that I grew last fall. The chickens really enjoyed the last of the greens when they were free-ranging. Last year I started growing basil, oregano, lemon mint, and thyme from seed. I saved seeds from the basil. Again, more culinary and medicinal herbs to come.

The Orchard

Five Small dormant fruit trees
These trees were temporarily planted here while I wait for the weather to get good enough to plant them in their permanent location.

I have these five fruit trees to plant when this weather warms up again. I have three apple trees—Liberty, Yellow Delicious, and Braeburn—, a peach tree, and a pear tree. There’s not much to see right now, but they will (hopefully) grow. More to this story later.

The Pantry

The pantry currently consists of one small freezer, some home-canned and store-bought canned and packaged goods, and a few plastic buckets and metal containers filled with rice, sugar, white flour, salt, and the like.

Canned Sweet Potatoes
After eating some fresh sweet potatoes, I decided to can a few and add to my pantry.
potatoes in buckets in the kitchen
I don’t have a root cellar yet, but i have found some success in storing potatoes in a cool, dry place in my kitchen.

Potatoes keep well for several months without any kind of special care. I just bought 100 pounds last fall and still eating on them now. I believe I have enough to last the two of us until I get a potato crop from my own garden.

So what will the next season bring? Stick with me and continue with me on my homesteading journey.

Do you have plants for producing your own food this year? If so, I would love to hear about your plans!

Becoming a Perpetual Homesteader

Just like every plant starts from a seed, a book series starts with a single idea.

Back in January 2019, I started looking at what if an EMP occurred and we were without power for a lot time.

This exercise led me to start a patio container garden at our townhouse in Springfield, Missouri. I grew tomatoes, potatoes, strawberry plants, onions, lettuce, and a few Lima beans. My husband said that all I needed were a few chickens to round out my patio homestead. Over the next several months, we stuck with this theme and my husband suggested that if we could find a place in the country (again) that we could start over. Our goal was to get a place that we could pay cash for. In August 2019, we closed on that place. We had a place with water and electricity on it.  A few months later we closed on an old trailer that my eldest son and wife had with it came an outdoor wood furnace. Our homestead was ready to become a reality.

In November 2019 I started Matt Power’s The Advanced Permaculture Online course. I spent the next several months immersing myself into permaculture ideology. Once I finish my permaculture design and create a permaculture project, I will receive my certification as a permaculture designer and instructor.

In March 2020, COVID-19 entered the picture. My job as a substitute teacher was put on hold and I was laid off for the rest of the school year. I decided that the best thing for me to do was to move to our new home. During the spring and summer and into the fall I worked on getting the place established.  I now have a large vegetable garden space, chickens that are laying eggs, my wood stove is heating our home, and we are in the process of planting a fruit orchard.

Today I am starting my permaculture project which I call The Perpetual Homesteader book series. In this series I will demonstrate how we can create perpetual food, health, and energy systems at our own homes to improve our lifestyles.