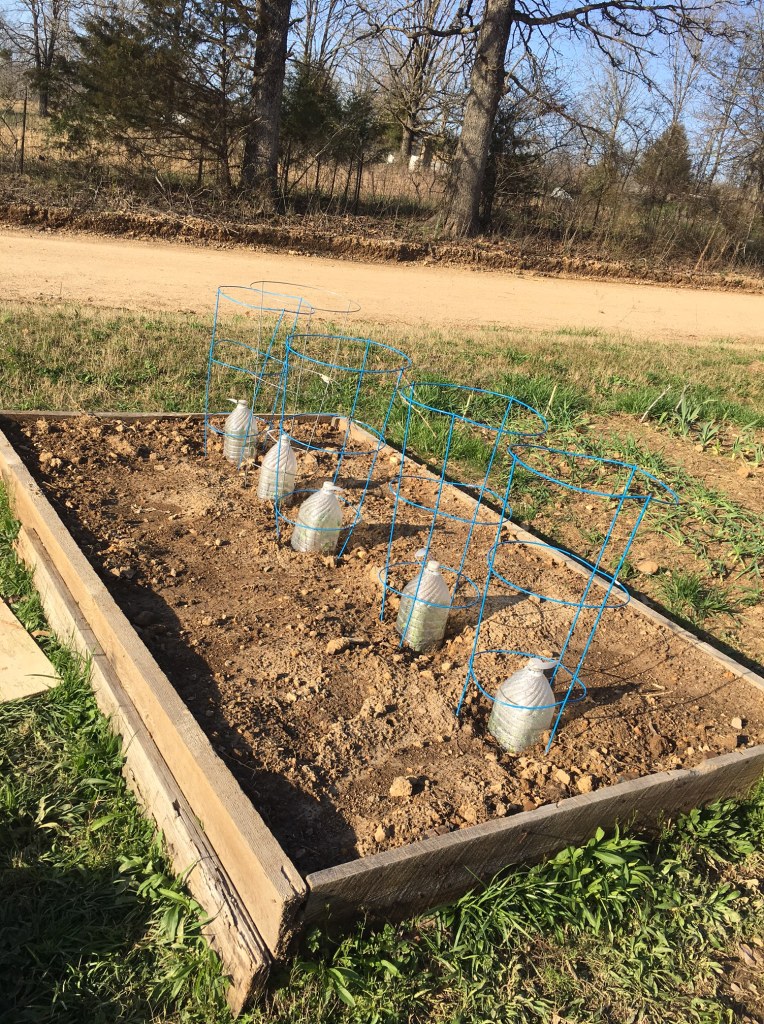
Planting these tomatoes was the first step in developing this raised bed.
One of the widely practiced strategies used in gardening involves interplanting. Intercropping is a gardening strategy that involves planting or growing more than one crop at the same time and on the same piece of land. It means having more than one type of crop growing in the same space at the same time. It also means more vegetables coming from that space! One of the most efficient ways to interplant is by using a raised bed.
Planting in Raised Beds
This can be done with numerous types of vegetables and herbs and will help you make the most of your garden space. We’re using growing our tomatoes and peppers in the same beds this year. We plan to get lots of tomatoes and peppers from a small space.
Planting the Tomatoes Outdoors
We’ve already planted the tomatoes in the middle of the bed and put cages around them so that they grow more vertically. We put water containers with holes cut out of the bottom to keep them warm enough not to freeze during frosts that are sure to come. At night we remove the caps from the jugs and during the day we take them off so that the tomato plants can breathe. We want to get the tomato plants well established before we put in the pepper plants. For more information about planting tomatoes see my post on this blog: Healthy Tomato Plants from Seed
Planting Peppers Outdoors
Around these tomatoes, we’ll be planting peppers in staggered rows two rows on each side of the tomato plants. Although we were able to plant the tomatoes in the beds before the last frost, we will put the pepper plants into the garden after all danger of frost has passed because we have found that they are much more sensitive to cold than tomato plants are. We have two of these raised beds devoted to peppers and tomatoes. One will have sweet peppers in it and the other will have hot peppers in it. We keep the hot peppers separate from the sweet peppers because often the two types of peppers will cross making the sweet peppers taste hot like the hot pepper. There’s nothing more shocking than eating what you think is a sweet pepper when in fact, it has crossed with a habanero!
To learn more about how we grew our peppers from seeds, see my post on this blog: Pepper Plants from Seeds
There’s More Room for Even More!
Once we plant the peppers in the bed with the tomatoes, we’ll sprinkle basil and cilantro between the pepper plants and put marigolds at the corners of the beds. These aromatic herbs and flowers will help keep pests from damaging the pepper and tomato plants. Even weeds will have a hard time competing with these plants!
You can make newspaper pots using newspaper and a recycled soup can for plants sensitive to transplant shock. You can use tape or hot glue to keep them together.
The average American creates up to 2,072 pounds of garbage every day. I would bet that my husband and I produce far less than that because we recycle a lot of what garbage we produce with garden projects. Here are a few of them that I have been using lately.
Making Seed Planting Containers
I have reused planting containers that I got from nurseries to use as my seed planting containers. I have cut the bottom out of milk jugs and water and soda bottles to use as planting containers and having seed some planting containers, I started using yogurt containers.
In addition, if I need biodegradable containers that I can use that will transplant shock in plants like cucumbers and other members of that family of vegetables, I make newspaper pots. I make them by cutting the bottom out of a tomato soup can and then cut newspaper pieces twice the length of the can and able to go around the can at least twice. Wrap the newspaper so that one end is even with the top of the can and the other half hangs over the end of the other end of the can. Wrap the can and hold the end with some hot glue. This creates the sides of your pot. To create the bottom of your pot, take the overlapping end and push it into the bottom of the can to create a bottom for your pot. To hold the shape of that bottom, use a dollop of hot glue. Carefully remove the newspaper pot from the can and begin making the next one.
Recycled Potting Soil
Once you have the pots, you’ll need something to fill them. If you have any, you’ll want to recycle your old potting soil too. This will save you money. To recycle it, you’ll want to add some homemade compost (made with recycled household and yard wastes, of course!). Add any other favorite organic fertilizer and you have soil ready to use again!
Recycled Seeds?
I save seed. I save a lot of money by saving the seed from one season’s growth to the next. This isn’t technically recycling, but it does create a sustainable source that you don’t want to ignore.
Preparing the Soil with Recyclables
After you have plants made from recycled items, you’ll want to continue using recycled materials in the garden. I never use store-bought fertilizers. Instead, during the winter I put yard wastes and kitchen wastes onto the garden and allow my chickens to eat and scratch in it. I also put my wood ashes on my garden areas. If I had more time in the fall, I would lay cardboard on the soil and the compost on top of that. So far, I haven’t done that, but what I have started doing this year is using the cardboard in my mulching system. Before the gardening season begins, I put cardboard down in the pathways and then cover them with sawdust (also a recycled item that I can get for the price of someone hauling it for me. If I had my own truck, it would be free.) More uses for cardboard to come!
Recycled Outdoor Planting Containers
A lot of times we just plant in the ground as a no-cost container. Other times, we have reasons for building containers. Most of my garden is currently planted in the ground, but I also have some raised beds made of old lumber that we had lying around our place that we nailed together. In addition, I have potatoes planted in used tires placed on cardboard and filled with garden soil. After the potatoes start growing, I fill around the potatoes with mulch. I also plant potatoes in recycled buckets. I put holes in the bottom of the bucket, fill it halfway up with soil and plant the potatoes in it. I then fill up the rest of the bucket with mulch. Once filled, I allow the potatoes to finish growing.
I don’t do this but I have heard a lot lately about people using cardboard boxes for growing potatoes. Do you or do you know of anyone who does this? Please tell me about your experience in the comments below.
Homemade Cloches from Recycled Milk Jugs
I am using recycled milk jugs for cloches. A cloche is a small translucent cover for protecting or forcing outdoor plants. I am using them to protect my tomato plants and pepper plants from late frosts.
Recycled Vertical Supports and Fencing
You must be careful when using supports that have been recycled. Rotten or insufficient plant supports can do more harm than good. Some of my favorite recycled vertical supports are supports made of durable materials like metal that will last decades. Fencing is the same. Purchase good materials in the first place and you’ll have materials to recycle indefinitely. For more ideas about vertical supports, see my post in this blog: Support for Your Garden Plant.
Recycled Mulch
Recycled yard wastes make some of the best mulch. Grass clippings and tree leaves as well as wood chips and sawdust all contribute to a well-mulched garden. I make mulch gathering around the yard easy by using a grass-catching lawnmower to chop and gather leaves and grass that goes onto the garden throughout the season. This mulch breaks down and becomes nutrients for the soil. I have found that the mulch breaks down too fast and that perennial grasses and weeds readily break through the mulch. This year I plan to put cardboard or paper feed sacks down before I put down the mulch to smother the weeds longer so that the plants have a chance to take over the bed.
These are, of course, not the only ways that I recycle otherwise disposable items and with imagination, I am sure that you can think of other ways to recycle them in the garden. What ways do you recycle in the garden?
Some plants need support and others do not. Some plants require support to prevent being deformed and prevent disease and pest damage from the ground. In addition, vines allowed to grow indiscriminately can choke out their own vines limiting proper fruiting of that plant.
Supporting your plants helps in saving garden space because you’ll allowing them to grow vertically. By training them to grow upward, you may even be able to utilize the space vacated by planting other plants under them.
Plants that need support
Plants that are best supported include cucumbers, peas, beans, winter squash, and tomatoes (especially indeterminate varieties).
Use Vertical Structures for Growing Up Rather than Out
These vertical structures can be placed in a way in which the plants around it are placed on the sunny side of a structure (in the northern hemisphere it is on the south side) or on the north side of a structure so that it shades the plants you’re trying to grow. Alternately, you could also place the structure in the center of the bed so that you can plant vegetables of both.
Some plants need structures to support a plant to go upwards. Fences, trellises, stakes, trees, corn, sorghum, and even hanging baskets are examples of verticals structures. Just be sure that the structure will be strong enough to hold the plant as it grows and develops. Lightweight and flimsy structures can easily collapse under the weight of a heavy plant.
Examples of structural Garden Supports
Fences-A fence around your yard that gives you enough sunshine can serve as a support for your plants. An open metal wire fence works better than closed wooden fences because the lack of sunlight can block the sunshine. A challenge can be weeds along the fence. This can be remedied by keeping weeds pulled or prevented with a heavy mulch.
In addition to existing fences, you can also consider putting up fencing specifically to grow within the garden. To save even more space, consider growing on both sides of a metal wire fence. I often plant peas on one side of the fence and later plant tomatoes on the other side.
Tomato cages-just because it is called a tomato cage, doesn’t mean it can only be used for growing tomatoes. Other vegetables can be grown on them as well such as beans or peas.
Bean towers-You can buy bean towers, or you can construct your own. Bean towers aren’t necessarily just for growing beans either. They can be used to grow peas. Sturdier ones may even be used to grow squash or melons.
Trellises- Like tomato cages and bean towers, trellises can be used to support any of the vegetables mentioned previously. As stated previously, be sure that these trellises are strong enough for the intended plants.
Stakes-Individual stakes can also be used to hold up individual tomato plants or used to support beans or peas. They can also be used as supports in windy areas for things like corn or potatoes.
Trees-we don’t often think of trees as supports for garden vegetables, but in some cases, plants will grow up trees especially if there’s adequate exposure to sunlight. Trees on the north side of a garden work well for this. In addition, you can grow peas in the spring on trees before the trees’ leaves are out.
Corn-Another living vertical support is corn. Corn is one of the well-known sisters in the three sisters’ garden and provides vertical support for beans and squash (or pumpkins).
Sorghum-Yet another living vertical support is sorghum. Sorghum is a lesser-known plant that can be used for its grain and for making sorghum molasses. I like to grow it with cowpeas and okra. It provides support for the cowpeas and grows well with okra.
Hanging baskets-many people don’t think of hanging baskets as vertical growing, but they are. Hanging baskets can be hung on the south side of a porch and offers a growing area for plants such as peas, pole beans, squash, and sweet potatoes. You can also grow strawberries in these hanging baskets.
Planting towers-Plant small plants in numerous built-in pots in a planting tower. Greens and many herbs grow well this way and if you plant the individual cells over time, you’ll have a continuous harvest of greens and herbs from an amazingly small space. You can build one of these yourself using pallets. Nail four of them together into a square. Half fill the center with soil. Plant indeterminant potatoes in that center part. On the outside, create little planting boxes around the outside and up the sides by securing landscape fabric to the bottom of each of the boards, and fill the little boxes with soil. Plant vegetables like lettuce and other greens, plant herbs like parsley, chives, and cilantro, and even fruit like strawberries in each planting box that you create. As the potatoes grow, fill in the bed with more soil, straw, hay or even dried grass clippings (dried because too many green grass clippings and the grass will heat up and burn the potato plants.
South (or in the southern hemisphere, north) facing wall of a building-You produce a lot in a space that is not often utilized in your yard simply by growing hanging plants and growing plants that grow vertically up trellises and utilizing planting towers that can either be homemade or purchased. It’s almost like having another complete garden area to work from!
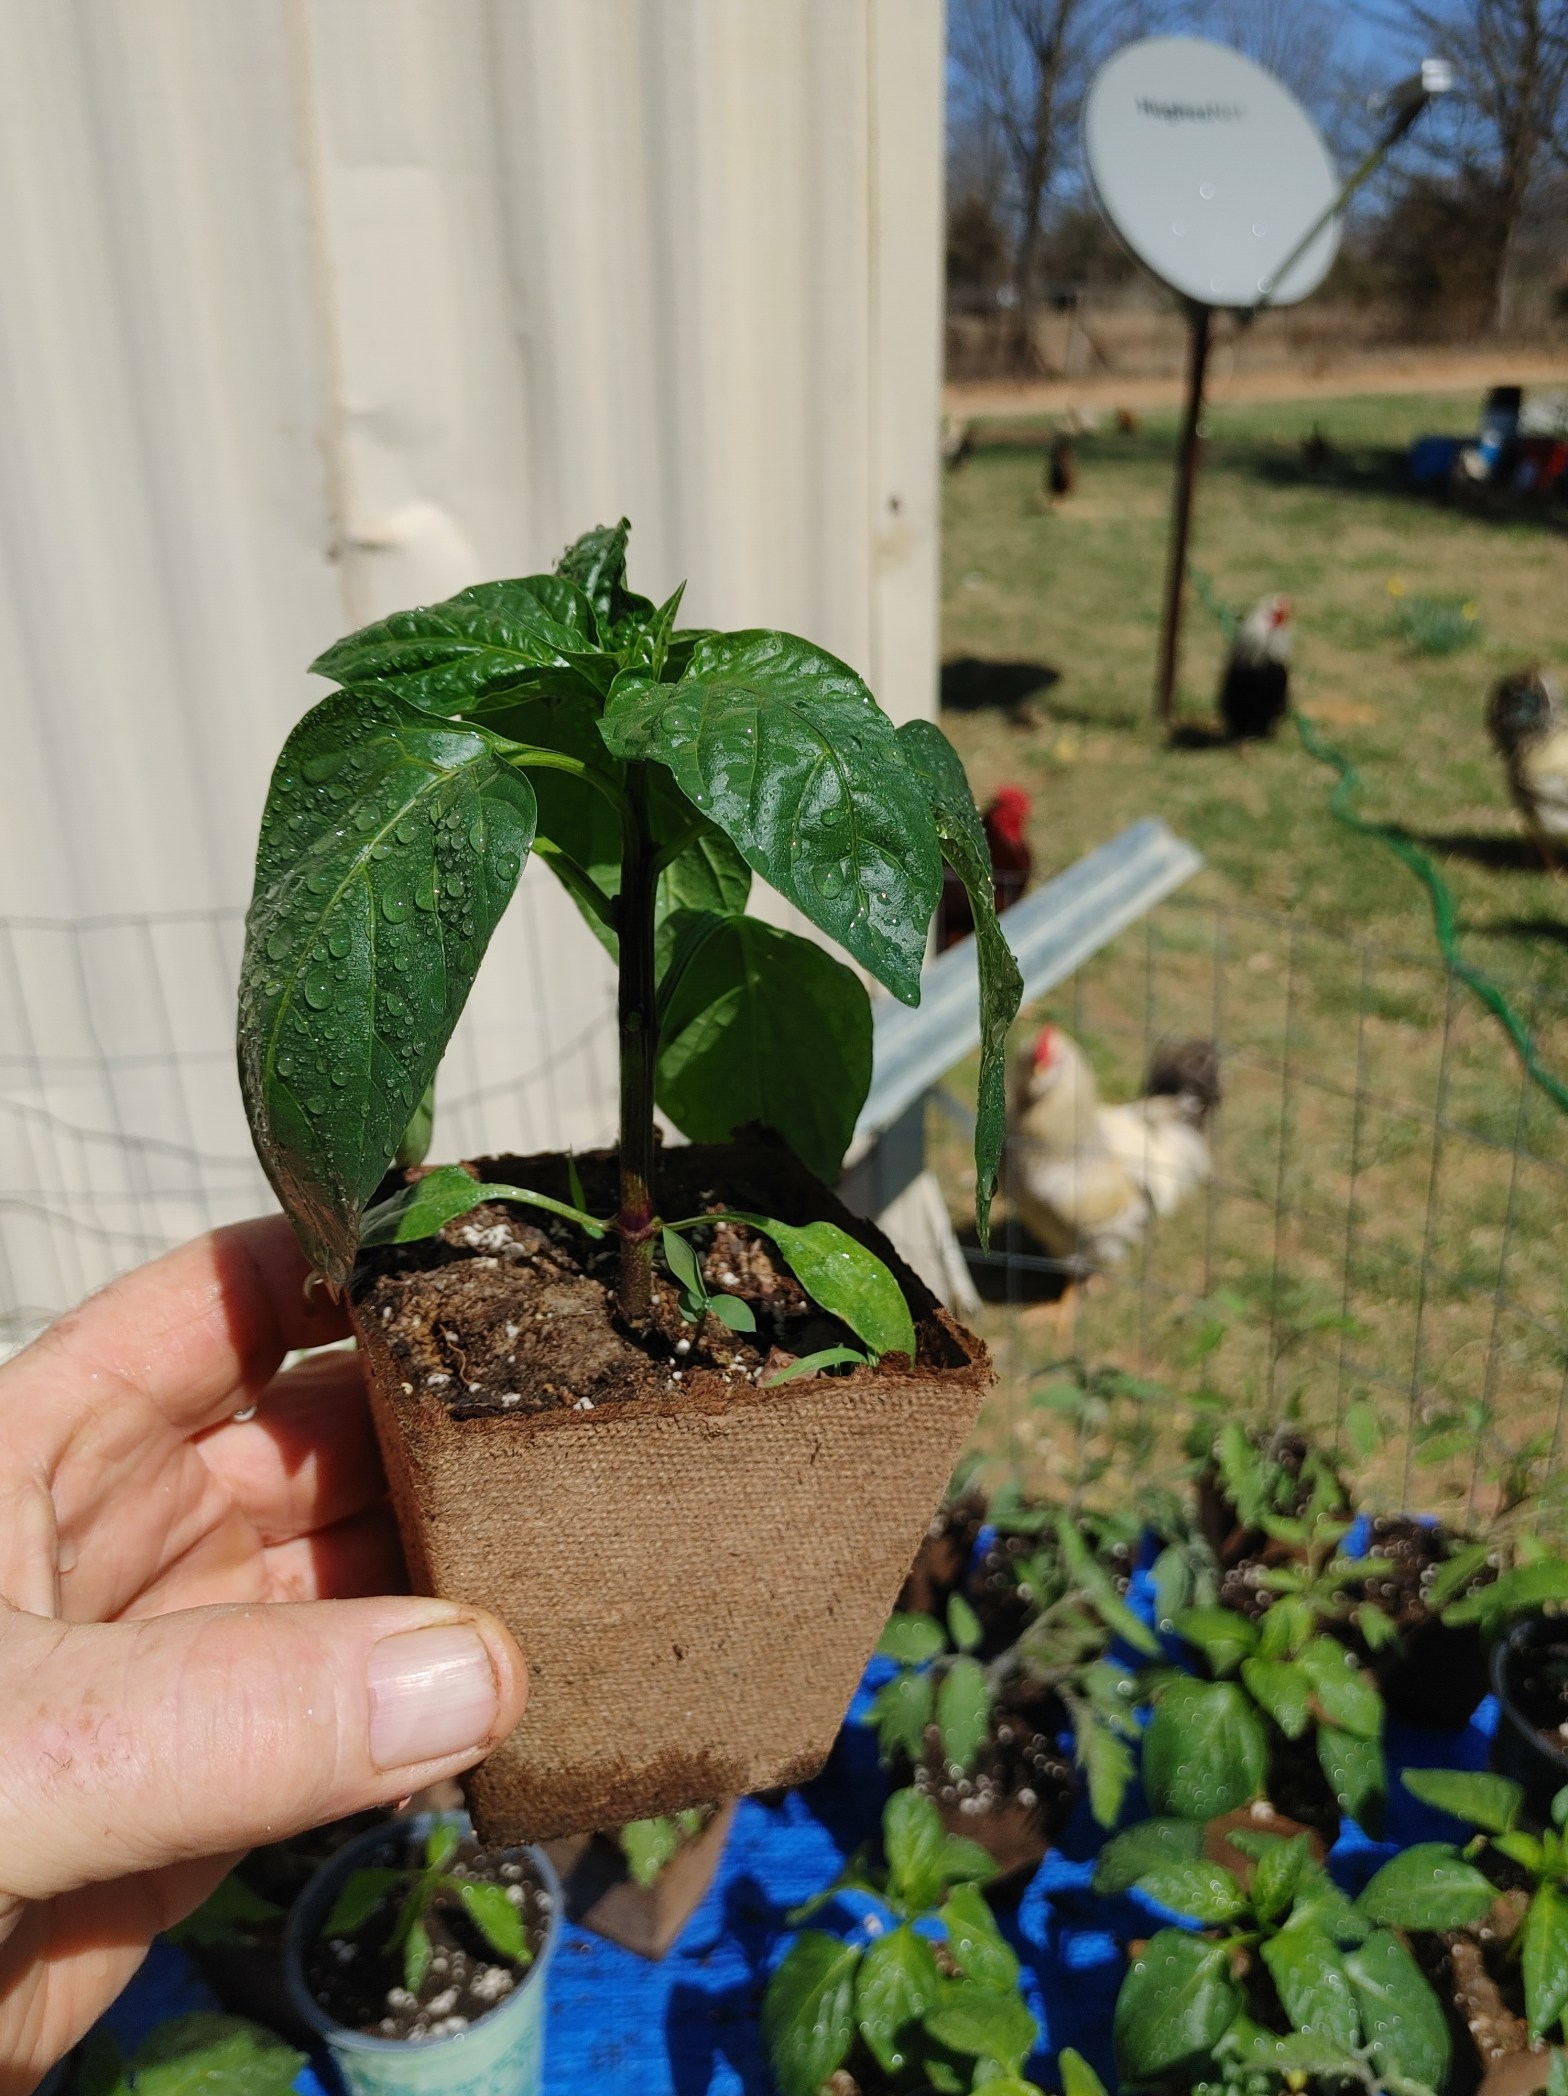
This pepper plant has been transplanted by placing a small peat pot into a larger peat pot enabling it to have more room without transplant shock.
Although it is easier to purchase ready to plant transplants, many reasons exist for growing your own pepper plants.
Why Grow Peppers from Seed?
The pepper transplants that I grow at home are healthier, sturdier seedlings than any I could purchase at a nursery. That means they’ll suffer less transplant shock, which often means better production.
I have found that healthy plants are less likely to develop diseases and are less prone to being attacked by insects.
Annual plants that I used to buy from nurseries were available only during a few months out of the year. Therefore, if I want to eat from my garden longer in the season, I had to learn how to grow some of my own. When I grow my own transplants, I usually end up with more plants than I need, so I share or trade with friends or neighbors.
In addition, you’ll be able to time transplants for when you need them, not just when they are available at the nursery. You can time them, so they’ll be just the right age when you’re ready to transplant Seedlings you buy are often root bound which slows down their growth. By growing your own transplants, your plants will have a better start on life and be healthier overall.
I discovered that peppers sown from seed let me choose from a larger number of varieties. A lot of gardening diversity is only available to gardeners who grow from seed!
In addition, things happen. If one of my plants dies, I have a plant available to fill in. I’m able to grow plants indoors that wouldn’t be able to grow outside at that time of the year. Not only can you grow transplants for getting an early start in the season, but you can also grow indoors in air conditioning, cool weather plants that don’t germinate well during the heat of the summer.
Peppers are especially sensitive to the cold and won’t germinate unless temperatures are warm because they are tropical plants. Because I don’t have a greenhouse (yet!) I start my pepper plants indoors. This year I discovered that my heat mat really speeded things up because the plants were kept warm enough to germinate.
Potting Medium
The purchased potting soil specifically indicated as seed-starter is good for planting seeds. The seed-starter potting mix has been sterilized so there are no fungal or bacteria that can overcome the young plants. If soil is not sterilized, young plants are especially sensitive to a disease called dampening off. This fungal disease is evident when the young seedlings sprout but suddenly turn to mush and the roots sport white webbing. By sterilizing the soil, the soil no longer can harbor this disease.
This potting soil has a light texture which allows the roots to grow deep. Garden soil is too heavy and may cause plants to rot if it has too much clay or sand, and the soil will not be able to hold the water that the young plants require. A peat and perlite blend gives the average plant its best shot at good root growth. Before putting soil in your pots, dampen the soil so that it has the moisture content of a well-rung-out sponge. You don’t want it too wet. Dampening the soil is best done in a large tub.
How to Plant Peppers
When I fill the pot with soil, I use biodegradable pots that I can bury the pot and all into the soil. You could use commercial pots of various kinds, or you can make your own. If you’re recycling pots from previous seasons, it helps to wash your pots and then soak those pots in a bleach solution for about fifteen minutes.
I put an indentation in the middle of the soil in my pot and drop in my pepper seed. I then cover the seed with soil to the point that soil covers the plant to a depth of two times the length of the seed. When in doubt, I use the depth recommended on the seed package.
Once the seed is covered, I spritz a little water over the top of the soil in the pot then cover the entire pot with some breathable plastic. This will keep the top of the soil from drying out. I have used plastic bags from the grocery store and have had good results. I keep the plastic on the pots until I see the seed leaves or cotyledons appear. These are the first leaves to emerge from the soil when a plant germinates. They are part of the seed’s embryo and provide nutrients to the plant until its true leaves unfurl and begin photosynthesis. Most plants don’t need to be in the light to germinate but make sure to get them under a light as soon as these first leaves appear. Good grow lights are critical to growing healthy pepper plants.
Once the peppers germinate, plants should be either put under grow lights or outside in a greenhouse. Keep them watered and fertilized until ready for transplanting.
When to Transplant Seedlings
I know when my plants are ready for transplanting when I loosen the plants from their containers and the plants hold their shape. If a large amount of soil is not held together by the plant’s roots, my plant doesn’t need to be transplanted yet. However, if the plant holds its shape and the roots are starting to wrap around the outside of the container, I’ll either need to repot the plant into a larger container or plant it directly in the garden.
When replanting into another pot, I fill the new pot up with soil and then take the pot where the seedling is growing plastic pot and all and create a hole in which the pot can fit. Once the hole is created, I sprinkle a little organic fertilizer into the hole (I use dried kelp) and then remove the plant from the pot and place it in the hole. I make sure that it fits so that I don’t need to add any more soil. I then pack the soil around the plant from the top and water from the bottom of the plant. I don’t plant the pepper plant any deeper than it was growing in the original pot.
Before I plant the peppers outdoors, I harden them off like I recommended for the tomato plants in the previous post Healthy Tomato Plants from Seed.
If you want to learn more about growing a home garden, check out my two latest books:
Tomatoes are the mainstay of almost every backyard vegetable garden and our garden is no exception. Our plans this year include eating all we can while they are fresh, canning them in various forms as well as selling some at farmers’ market. We have planted several varieties of tomatoes that we plan to put in our garden this year.
Planting Tomato Seeds
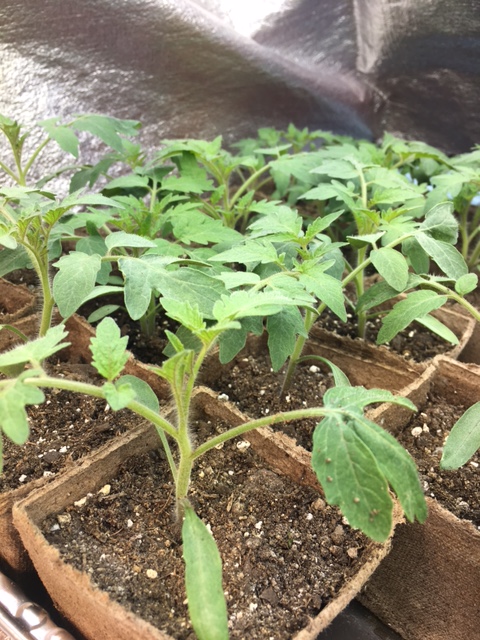
I plant tomatoes differently than I plant other annual vegetables from seed. I have a special way that I start them that helps me grow strong healthy tomato plants with deep root systems. This year I discovered that I like growing them in peat pots which will be easier to transplant and cause less stress to the tomato plants than growing them in plastic pots would. Instead of planting them in a small planting cell, I like to plant them in quart-size pots and fill only half of the pot with soil. I then plant tomato seeds in the pot and cover the pot with a plastic bag. I then put the planted pot on a heating mat. Within a few days, the tomatoes begin the germinate.
After the seed germinates, I put the small plant under grow lights and let the plant grow. Once the plant has its first true leaves, I start adding more soil to the pot around the young seedling. As the plant grows, I add more soil around the stem of the plant until I have filled up the entire container. New roots will start growing around the stem of the plant. Once you have a nice plant above the rim of the pot and the danger of frost has passed, it’s time to prepare your plants to plant outdoors.
Hardening Off
Don’t confuse ‘hardening off’ with ‘dampening off’. Dampening off is a fungal disease. Hardening off is a process in preparing your plants for planting outdoors. Plants grown indoors have been treated delicately as they grew, but when we put them outdoors, they are exposed to things they don’t get exposed to indoors like heavy rains, strong sunlight, and drying winds. Hardening them off toughens them over a week or so. By doing this they can better handle what nature throws at them. If you take plants straight out of your home or greenhouse to plant them into the garden, they don’t have a good chance of surviving the transplant. They will start by wilting badly and going into shock. Their leaves can turn white from being sunburned. You’ll slow down their growth or worse, kill them.
You’ll need to have a way to take your plants in and outside because in the next several days you will be doing just that. A strong tray or box works well for this purpose. I use cookie sheets that I picked up at a local secondhand store. Also, you will need a place to put your plants where it will offer shade at least part of the day and where they will be protected from the wind.
The hardening off process will take you between a week and ten days to accomplish. Start by placing your plants in the shaded area. Keep them outdoors for between 30 minutes and up to four hours. On the second day, increase the time your plants are outdoors by an hour. On the following day, put them in a location where they have some filtered sun and increase your time by another hour. Continue increasing the hours outdoors and exposure to sunlight by an hour every day. If a cold snap prevents you from taking your plants outdoors, you may need to start the process all over again or add a few days to the process. This depends, of course, on how cold and how long the cold snap lasted. On the last day or so before transplanting, put the containers in the garden where you plan to transplant the plants and leave them there all day. If they don’t show any signs of distress, they are ready to transplant into the garden.
While hardening off, put extra water in the plant reservoir and increase exposure to breezes as well.
How to Transplant Tomatoes
When I plant tomatoes in the garden, I plant them differently than I do other plants to produce strong root systems and increase production.
I have learned that it is important to put the support structures into the area where I am putting in the tomato plants before planting the tomatoes. This prevents damage to the plant roots. The only exception to this would be tomato cages which you would put in immediately after planting and do your best to avoid severing the roots with the cage.
Once you’ve hardened off your plants, you’re ready to transplant them into the garden. You shouldn’t plant your tomato plants to the same depth as the pot in which they were growing. Instead, remove all but the top cluster of leaves and plant the tomato plant up to that top cluster. Before planting, however, you’ll want to remove any flowers or small fruit that may already be forming. This may seem counterproductive, but at this stage of the plant’s growth, energy must be concentrated on the plant’s roots for the best production from the tomato plants. The stronger the root system, the more resilient the plant. If you live in an area that lacks rainfall and is hot, plant tomato plants deep. If you live in an area where rain falls regularly and the temperatures don’t cause soil to overheat, plant them so that the roots spread out sideways along or in front of the bed.
Dig the hole for the tomato plant in the way that you intend to plant it. Now, In the bottom of that planting hole, put a dusting of powdered kelp. Sprinkle in some worm castings, as well, if you have them. The kelp will ensure that the tomato plant gets the nutrients needed to prevent blossom end rot and the worm castings will provide nitrogen in the root zone will give them a boost for growth right after transplanting.
Water the bottom of the planting hole and then put the tomato plant into the hole. Because my tomatoes are planted in the peat pots, I can bury them pot and all. Cover the plant’s stem with soil up to the leaf cluster at the top of the plant. Again, water over the entire area where the plant is buried. Keep the soil around the plant moist until you see new growth on the plant then water deeply once per week, or let the rain do it for you, at the rate of one inch per week. It is important to maintain even watering of your tomato plants especially during dry weather to prevent your tomatoes from splitting when it does rain.
When you see new growth in the leaves on the tomato plant, mulch around the plant as well to help keep the tomato plant’s moisture from evaporating. Mulch also prevents rain or irrigation water from splashing onto the plants which can cause blight to spread from the soil onto your plants.
Through the Season Maintenance
Once you have your tomato plants established with a great root system, you’ll be in maintenance mode. Much of what you have already done will ensure that you have healthy plants that shouldn’t have as many problems during the growing season. Some of the other things that you’ll be doing, while you’re maintaining the plants, will be tying up the plants so that they are not laying on the ground, watching for pests, weeding, mulching, and watering until your tomato crop comes in. I’ll be sharing more on this in the coming weeks. Until then, happy gardening!
My Latest Gardening Book Available on Kindle!
For more gardening tips, check out my latest book on growing vegetables that you don’t have to can, freeze, or dehydrate The Survival Garden. The Survival Garden will get you through the winter.
“A man may fish with the worm that hath eat of a king and eat of the fish that hath fed of that worm.”
William Shakespeare on the earthworm’s transformative power
Household waste that my chickens don’t eat, the earthworms do. The earthworms till the soil and then the chickens eat some of those same earthworms! Great protein! Free!
Recently I thought about getting one of those worm farms and doing what is called vermiculture. I have decided that instead of buying a bin with worms, I would let the earthworms that are already in my soil improve the soil directly in my garden.
Recycling with Earthworms
Vermicomposting is a process that relies on earthworms and microorganisms to help stabilize active organic materials and convert them to a valuable soil amendment and source of plant nutrients. In many ways, the process is easier than composting. Earthworms will consume most organic materials, including food preparation residuals and leftovers, scrap paper, animal manure, agricultural crop residues, organic byproducts from industries, and yard trimmings.
Up to 60 percent of what Americans discard are organic materials. Instead of disposing of food scraps and yard wastes in landfills even from high-rise apartments, the materials can be made into vermicompost. When vermicompost is added to soil, it boosts the nutrients available to plants and enhances soil structure and drainage. Vermicompost increases plant growth and suppresses plant disease and insect pest damage.
Vermiculture, at its heart, is very simple. Put organic materials on the surface of materials where red worms live and let them do their thing. You can purchase earthworms, but I haven’t done that. Instead, I have a system in which I feed the earthworms that are already growing in my garden soil!
Here’s How I Started My Version of Vermiculture
Last summer I covered one of my smaller garden beds with grass clippings and then during December, I dug what remained of the grass clippings into the soil. After digging the soil, I started putting my kitchen scraps into the garden and allowed my chickens to pick those scraps and eat what they wanted. What the chickens didn’t eat along with their manures were left for the earthworms that were already present in the soil. Around the first of February, after we had several days of above-normal temperatures for that time in the winter, I dug the remaining scraps into the soil. This digging also introduced more air into the soil as well. Even though it was winter, I found numerous earthworms growing in the soil, mixing their excrement into it and making their own air pockets.
In Situ Vermiculture: Food for the Soil, Food for my Chickens
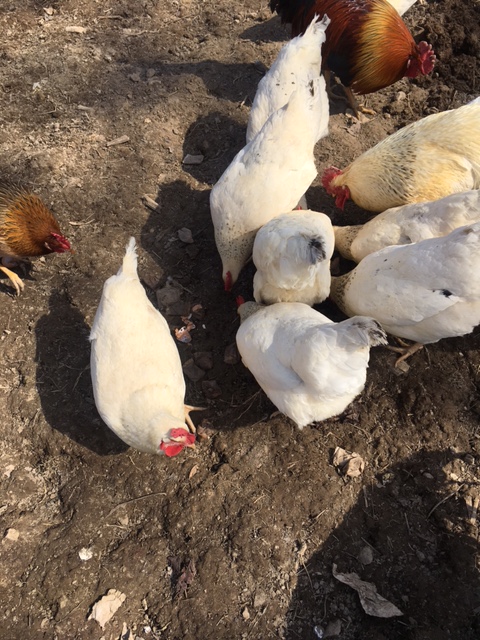
The chickens came running when I started digging in the garden bed and decided that the earthworms should be their food. They started pulling worms out of each clod of soil that I loosened. I didn’t figure that the birds would eat all of them, so I let them. I am sure that there are a lot more worms where those came from and earthworms are protein-rich. Therefore, by eating the earthworms, the chickens cut down on the cost of their feed anyway. With the cost of feed lately, I’ll take any help I can get! (I dug in the garden this morning and sure enough, there were still plenty of worms left!)
This experience that I have with this situ vermiculture bed is one of the things that I love about organic gardening. I’m working with nature rather than against it. We, humans, are at the top of the food chain and the chickens are just below us. The earthworms are below the chickens and the micro-organisms that decompose the food scraps are even lower than the earthworms. When I’m working with nature, the items that I don’t eat become food for those at the bottom of the food chain, and nutrients aren’t used up. Instead, they are passed up the chain as food for the next organism in the process. We simply must insert ourselves into the life cycle and consider no organic material as waste, but something for some other organism to consume.
When the gardening season comes along, I will benefit from sharing with those worms and the chickens because I will benefit from the plants that will grow next year on the improved soil. In addition, I will be able to benefit even sooner from the eggs produced by those chickens that ate those earthworms!
Do you want to grow a garden this year? Have you thought about how you’re going to improve the soil? Have you thought about raising worms? Do you have any experience with vermiculture? If you have any comments or questions, please share them below!
If you like what you’re reading here, consider following this blog! And check out my latest book The Survival Garden and look for its soon-to-be-released sequel The Four Season Garden!
What should you plant in your vegetable garden this year?
It’s that time of year again! It’s time to purchase seeds for starting the annual vegetable garden. But what should you be growing? With the uncertainties of the food supply chain, it is imperative that you know how to discover what to grow in your vegetable garden.
If you’re new to gardening, this article is here to show you where to go to discover what you should grow successfully.
Grow What Your Family Will Eat!
Probably the most important advice that you’ll get from anyone is that you should grow the vegetables that your family will eat. For instance, if your family doesn’t like carrots, you shouldn’t grow them. If your family only eats corn, green beans, potatoes, and tomatoes, then you should grow them. You should grow them if those vegetables will grow in your area. So, determine what your family will eat and put them on a list. Now that you know that, it’s time to find out what you CAN grow where you live.
How Do You Know if What You Eat is What You Can Grow Where You Live?
I would love to be able to give you step-by-step instructions on how you can grow your best garden every year, but even if you did exactly what I do, you won’t get the same results that I get. In fact, if I do the same plantings in different locations or in different years, I will get different results.
I can’t tell you when to plant specific varieties of plants, nor can I tell you specifically what vegetables you should plant when or whether or not you should plant a specific type of vegetable! I would take with a grain of salt anything that anyone who tried to say that they can do this for you. I can, however, suggest places you can go to get better educated on your planting region and zones so that you can make better choices on what grows in your area and what doesn’t. This information can also help you know when to plant your garden and the general types of vegetables to plant.
Your County Extension Office
One of your local resources is the county extension office of your county if you live here in the United States. These people are paid with your tax dollars so why not hear what they have to say. They can tell you what zone you’re living in, what others have grown in your area, and what you should consider not growing.
Glean Information from Your State Conservation Department
Speaking of those who are paid with your tax dollars, you can also contact your local conservation department to learn what animals might be a problem for your crops and what you can do about them as well as what endangered plants and animals you should avoid killing. They may also be able to tell you when various insects are likely to be causing problems in your area.
Plus, they will tell you things that you should know like how many deer, raccoons, possums, crows, and other animals are near where you live. This is good information to have if you want to know what critters are in your area. Deer may be a great resource if you’re a hunter but are not so good for you as a gardener. If you want to grow a lot of corn, you may want to have a plan in place to combat raccoons.
Fellow Gardeners as a Resource
Find out about other gardeners in your area. Perhaps there’s a nearby gardening club. If another gardener lives nearby and you like how their garden looks, consider introducing yourself whenever you see them working in their garden. Be sure to have a list of questions that you would like to ask. Most gardeners are happy to share what they know, especially if you offer to help do a little weeding with them while you talk. They can also tell you about what you can and can’t grow.
Seed Catalogs
Seed catalogs also offer a lot of information about specific varieties. Pay particular attention to what zones the variety grows best and compare that to where you live. If your planting zone falls into the recommended zones, that seed might be a good option for you. In addition, the seed catalog description will tell you how much sun the plants will require, how far apart to plant the seeds, how far apart to put the rows, and how many days from seed, or transplant to harvest.
Seed Package Information
Don’t overlook the seed package itself as a resource. It’s pretty much the same information that comes from your seed catalogs but is more readily in hand.
Your Own Experience
That’s not to say that I believe that you should take the word of anyone else as gospel. Your own experience will teach you better than what others can tell you about what vegetables will grow where you live. As I said before, your land is going to be unique and will have its own set of idiosyncrasies also, what works one year might not work the following year.
For instance, my garden in 2020 was amazing. I purchased one of those “survival gardens” that had numerous types of vegetables and I planted some of all of them in my garden (at the right time of year, of course). I was able to keep getting food from the garden all spring, summer, and fall from what I planted. My experience in 2021, had different results. My bush beans didn’t do well, but later my pole beans did, but the pole beans had not done well during 2020, but the bush beans did). I had a difficult time getting squash of any kind to produce. The insect pressure was too great. (It was the same for most people in my area, even those who used pesticides which I don’t use.)
I can’t tell you that you will have a perfect garden every year, but what I can tell you is that if you grow a diverse variety of vegetables, plant over several months, and maintain healthy soil, you’ll develop a garden that you can pick from every day of the year from early spring to late autumn and beyond!
What I can tell you is that by experimenting with different growing styles and vegetable varieties, you will soon know what works in your location and what doesn’t.
Are there questions you have about what vegetables you should grow where you live? Is there anything that you would like to comment on regarding what you like to grow in your vegetable garden?
If you like what you’re reading here, consider following this blog! And check out my latest book The Survival Garden and look for its upcoming sequel The Seasonal Garden!
Where you locate your garden is as important as what you put in it.
With the price of food skyrocketing, many people are gardening this year for the first time. This article is to help you determine where the best place is on your property for your vegetable garden. If you’re thinking about putting in a vegetable garden this year, you’ll need to consider several factors for where to put your garden. You’ll need to have good accessibility, you’ll need to know your climate and weather, you’ll need to know how many hours you have access to direct sunlight, and you’ll need to know where water is most readily available to your garden, and you’ll need to have a location with good soil.
Personal Accessibility and the Accessibility for Tools
How easily can you get into the garden? Do you need special accommodations to be able to work in your garden? For example, if getting down on your knees is too difficult, perhaps you should consider using raised beds that eliminate much of the bending and stooping.
Also, can you get whatever equipment you’ll be using into the area? What about supplies? Can you easily get supplies like manure, compost, and mulches to your garden area?
Climate and Weather
How well do you know your climate? What is your average monthly rainfall for each month of the year? Does your area usually have regular rainfall during the summer months? Are there months when you’re likely to need to irrigate? How many sunny days do you have every summer? What is your average high temperature each month? What are your summer highs? What are your summer lows? When is your average last frost date in the spring? When is your first average frost date in the fall? Don’t know the answers? Ask a neighbor or friend who has been gardening for a long time or contact a local government agency.
Sun Access
Will your garden have at least six hours of direct sunlight per day in the spring? How about in the summer and fall? Is it possible that you’ll have too much sun for your vegetable plants?
A seedling’s sun exposure requirement is indicated on the seed packet or nursery label. Full sun is 6-8 hours of direct sunlight each day. Next, plant your garden to follow the sun. The sun rises in the east and sets in the west. The Eastern morning sun is mild and the western afternoon sun is considerably hotter, especially in the summer.
Row orientation. Experts advise the best way to give plants the most sun exposure during the northern hemisphere’s growing season is to plant rows of vegetables running north to south. Personally, I plant my rows going east and west and plant taller plants on the north side of the garden and shorter plants to the south.
Access to Water
Almost every annual vegetable that I have ever seen requires at least one inch of water per week. In most areas, at certain times during the gardening season, the rain will not be sufficient to provide that one inch of water per week, so you’ll need to supplement the water needed for optimum productivity.
Watering for too long creates an open invitation for fungus. Water too little, and roots become shallow. If you’re watering too high off the ground, half the moisture will be lost to evaporation.
Water is a precious resource for any gardener. Consider collecting water for your garden with rain barrels that have garden hose connections. You can build your own rain barrel or shop top-rated rain barrels.
The best time to plant is either in the early morning between 5 and 10 a. m. and in the evening just before dark. (Though some experts say to never water in the evening because warm wet soil and foliage attracts insects, fungus, and disease.
Avoid watering lightly or more often because it promotes shallow root growth. Be sure to water deeply and about 1-2 times per week only so that the water reaches the root. Soaking the soil to 5 to 6 inches encourages deeper root growth and creates more resilient plants.
Don’t water overhead. Water the base of the plant rather than the foliage because wet foliage invites fungus. Also, less water will evaporate because you’ll be watering the root zone making it more available to the plant roots. For best irrigation methods that conserve the most water, use a drip irrigation system rather than a sprinkler system.
To conserve even more water, mulch beds and containers with several inches of organic mulching material cool the soil and retain moisture. Watering soil that hasn’t been much can splatter mud on plants and cause runoff. An added benefit is that mulching also cuts down on the need for weeding!
Flatten a Garden Slope
Sloped garden areas are unique challenges including difficulty maneuvering on the sloped ground, establishing plants on it, and controlling erosion. You may want to use the land for perennial ornamentals or perennial vegetables, berries, or even orchard trees, rather than cultivating annual plants on it, but in many cases, the recommended steps below may make annual gardening possible.
Next select plants. Grow perennials or suitable groundcovers whenever possible between annual beds to act as soil anchors, slow the speed of the water running down the slope and reduce the force of impact of raindrops on the soil surface.
When you plant, orient rows or plants on contours perpendicular to the slope and alternate plants in rows so that individual plants are staggered and prevent water from running in a line straight down the slope. When cultivating, leave small channels between rows to collect water and allow it to drain slowly into the soil.
Many people would direct water off the slope with one or more French drains or perforated drainpipes located halfway down or at multiple levels on the slope. They create a trench at least 6 inches deep and wide that runs perpendicular to the slope and leads to a ditch, rain garden, or another suitable outlet. They place perforated pipe in the entire length of the trench and fill the trench with clean, coarse gravel. If the soil is particularly silty, they might line the trench or wrap the pipe and gravel in landscaping cloth or filter fabric to prevent clogging.
I think that a better choice is to use berms and swales Instead of using a French drain to redirect water. Berms and swales help slow and direct heavy rains to soak into the soil rather than being directed down and off the slope. The longer it takes for water to meander down a hill, the more it will soak into the ground.
A swale is a shady spot, a sunken or marshy place, or in other words, a shallow channel with gently sloping sides. A swale may be either natural or human-made. Artificial swales are often infiltration basins, designed to manage water runoff, filter pollutants, and increase rainwater infiltration.
A berm is a level space, shelf, or raised barrier, usually made of compacted soil, separating areas in a vertical way, especially part-way up a long slope. It can serve as a terrace, road, track, path, a fortification line, a border/separation barrier for navigation, good drainage, industry, or other purposes. Berms also control erosion and sedimentation by reducing the rate of surface runoff. The berms either reduce the velocity of the water, or direct water to areas that are not susceptible to erosion, thereby reducing the adverse effects of running water on exposed topsoil.
If a slope is very steep, install terraces or a retaining wall. Terraces break the slope up into multiple nearly flat steps. A terrace can be made from earth, rocks, timber, or other materials. Each “bench” should have a slight slope perpendicular to the hill’s slope to direct water to one side or the other. Also, consider putting in steps to make maneuvering down the terraces easier. Just be sure that you’re not using treated lumber if you are growing vegetables because any leaching from the lumber is toxic to the plants and to you too.
In addition, spread mulch over the soil around plants. Mulches such as wood chips or shredded bark slow runoff while also conserving soil moisture, regulating soil temperature, and contributing nutrients as they break down. Don’t depend on just mulch to keep soil in place on a very steep slope, however. The mulch may just wash off after severe rains.
Plant Where There’s Rich Organic Soil
Plant your garden where you have good soil that is rich in organic material. The organic material improves the ability of the soil to retain water and the rate at which water is absorbed.
Improving the soil condition is an easy fix. Add organic soil amendments including manure, compost, sphagnum peat moss, or grass clippings. The best time to add most of these is in the season before planting the garden rather than during that season. If your garden is small enough, consider topping the surface of the whole garden bed with compost and then plant into the soil. Once the plants start growing, cover the compost with mulching material. Use foliar sprays and side-dress plants with amendments during the growing season for an added boost. If you continue adding organic material of different types, every time you plant, you will be amazed at how much your soil will improve.
That said, some hard, rocky, or hardpan soils can’t be readily used, and building up an area by creating a raised bed may be necessary. This is also a choice that many gardeners choose because of the convenience of a raised bed.
Imagine not having to worry about whether there’s an adequate supply of fresh produce at your local grocery store or whether it has been put on a recall list.
Cygnet Brown
Imagine every night going to the garden and picking vegetables for your supper. Imagine not having to worry about whether there’s an adequate supply of fresh produce at your local grocery store or whether it has been put on a recall list. Wouldn’t it also be nice to know that you have the added satisfaction of knowing exactly how your vegetables were grown and that it’s fresh?
\That’s some of what you’ll get when you develop a seasonal garden. What is a seasonal garden you ask? A seasonal garden is a garden that isn’t just planted once in a season and then forgotten. It’s a garden that you start planting early in the spring before the last frost and continue planting over the rest of the summer so that you have a continuous harvest all the way until the last frost and beyond.
Increased Nutrition in Vegetables
You’ll love the fact that you’re picking your produce from your garden daily and eating it fresh because it increases the produce’s nutritional value. According to a University of California study, vegetables lose 30% of their nutritional value within a week of being picked and spinach can lose up to 90% of its vitamin C within 24 hours of harvest. By picking your vegetables straight from your own garden, you’ll be giving your family the most nutritious food possible.
If you raise it organically, you’ll be getting an even higher nutritional content because the soil would have more micro-nutrients available for your vegetables. Considerable evidence exists that decreases in nutrition may be related to changes in farming methods, including the extensive use of chemical fertilizers, as well as food processing and preparation. A 2004 study evaluated Department of Agriculture data for 43 garden crops from 1950 to 1999. The researchers found statistically reliable declines for six nutrients — protein, calcium, potassium, iron, and vitamins B2 and C.
An added benefit to growing your food organically is that it can cost you less than growing it using chemical fertilizers especially if you’re composting house and yard wastes and using it in the garden!
Protect the Environment
Growing your garden and eating it directly can help protect the environment and lower your carbon footprint. Recycle yard and garden waste to keep it out of landfills! Decrease transportation costs to the environment because your vegetables are not coming from other states or countries! Decreases the need for food processing for storage in things like canning supplies, freezers, and dehydrators because you’re using your vegetables straight from the garden!
Use Your Gardening Hoe as a Piece of Exercise Equipment!
Plus, if you choose to dig your garden by exclusively using hand tools like hoes, shovels, rakes, and broad forks, not only will you be lowering your carbon footprint, but you’ll benefit from increased physical activity as well. It provides healthy exercise. The bending, stooping, raking, hoeing, and digging of your garden will likely increase the amount of exercise you are getting. In addition, time in the sun provides vitamin D.
The Emotional Benefits of Gardening
It benefits your emotional and mental health too. Along with being an excellent way to fill your free time, gardening also helps to promote mental health and emotional wellness. The American Institute of Stress states that gardening can have the following mental health benefits:
It will save you money in many ways as well. Growing food organically and making household and yard wastes into compost saves money on fertilizer. Using produce directly from the garden daily prevents the expense of canning or freezing. It even reduces the need for refrigerator space because you’re using the produce soon after you pick it up!
Also with the price of food going up and up these days, the carrots you plant now may be worth much more by the time they are ready to harvest!
Amazing Benefits to Eating Fresh from the Garden!
As you develop your garden, you’ll get better and better at being able to eat from your garden every day. If you compost your house and yard wastes, your garden soil will become better and better, and your health will continue to improve as well because your exercise and food consumption will be of better quality. You’ll save money. You’ll be helping the planet as well by removing carbon from the air and replenishing it in the soil. It will be a win, win, win!
Can you think of other benefits for this type of gardening? Please share them in the comments below.
If you want to know more about seasonal gardening, follow this blog to learn more and about when my latest book The Seasonal Garden will be available! In it you’ll learn the how-tos of growing a garden you can eat from frost to frost and beyond. If you’re in obtaining a review copy, let me know in the comments below! Interested in what else I write? Check out my other blog How My Spirit Sings
One of the things that I discovered during the past two gardening years has been ways that I can get more from my harvests and how I can perpetuate a garden crop, which has been the focal point of this blog. Nothing can be easier than perpetuating sweet potatoes.
Here’s how many people start their own sweet potato slips. They wait until January or February and use this method. It’s how I started and it works, but I’m sharing a better way!
Rather than waiting until spring to create slips from sweet potatoes from a sweet potato root, I started collecting sweet potato roots with the stems and leaves attached in the fall and planting them in containers in the house to last all winter. But first, let’s find out how to take care of the sweet potatoes you are dig up.
Digging Sweet Potatoes
Where I live, it is now time to dig sweet potatoes. I use my broad fork to dig my sweet potatoes. To avoid damaging the tubers, I begin digging just outside where the potato vines are growing and dig in toward where I planted the original vine. That way as I come to a sweet potato, I finish digging it out with my hands and then place the sweet potatoes in a bucket. Once all of the sweet potatoes are picked, I take them inside and place them in a warm and dry, but dark area to cure. Some southerners recommend storing them in temperatures as high as ninety degrees so don’t worry that the temperature is too high where you are storing them. I spread them out on a table so that they can cure evenly and remove excess dampness that can expedite decomposition. Spreading them out and allowing them to dry out allows the skins to harden.
In addition to hardening the tuber’s flesh, curing in a warm and dry environment helps convert the starches of the sweet potatoes into sugars thereby increasing the sweetness of the sweet potatoes. Putting the sweet potatoes into cold storage stops the change from starches to sugars, so don’t move the into cold storage until they have cured in the warm dry environment for two weeks.
After the two weeks, I remove any damaged sweet potatoes to use regularly and store them in boxes in a cool dark place.
Periodically remove any sweet potatoes that show signs of decomposition. If you plan to can any of your sweet potatoes, for best results, can them before New Year’s Day.
Saving Sweet Potato Roots and Leaves Now for Spring Planting
Sweet potatoes are perennials so, the roots have the same genetics as the sweet potato. This enables me to eat the big sweet potatoes rather than keeping some back for producing slips.
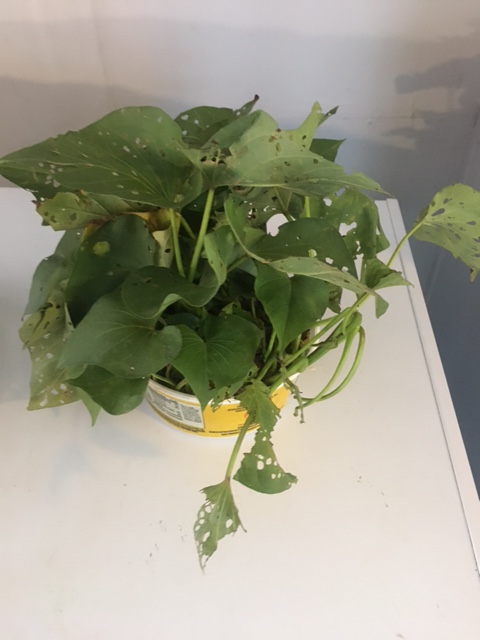
Because I am growing the roots all winter, the plants produce more slips in the spring and uses parts of the sweet potato plant that I don’t usually use. I also get the added benefit of access to the sweet potato leaves that I can use during the winter months. These leaves are delicious and can be eaten raw or steamed and provide even more nutritional value than the sweet potato tubers.
When growing new sweet potato plants, most people purchase a sweet potato in the spring and plant the slips they produce from it or they purchase slips (often hard to find) from other growers. These slips can be put in the ground even without roots. Just keep them well watered and soon they will take root, and in a few months, will begin producing sweet potatoes.
I have my own solution. I grow my sweet potatoes from the roots left over from the previous year.
Because I am growing sweet potato roots all winter, the plants produce more slips in the spring and uses parts of the sweet potato plant that I don’t usually use therefore I can eat every sweet potato myself.
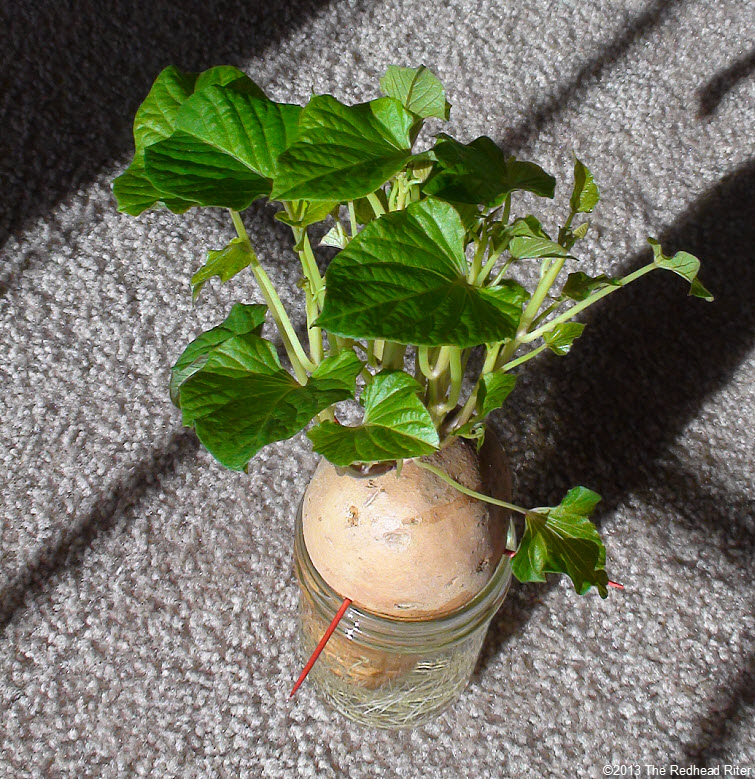
I have grown sweet potatoes from roots of sweet potato plants that I grew this year. These roots will begin creating shoots and leaves. Once that happens I can plant it in a shallow tray for the rest of the winter
Since I’m digging sweet potatoes anyway, and sweet potatoes are perennials and the roots have the same genetics as the sweet potato, now is the perfect time to start the sweet potato slips for next year’s crop. As I dig the sweet potatoes from the ground, instead of throwing the roots onto the compost pile, I put them in a bucket and take them indoors.
If the weather is not too hot, I have just put the sweet potato vines and roots into a bucket, then in an hour or so taken the vines and roots into the house to process and still had success. However, a better solution is to have a bucket of water to put the vines and roots in so that they don’t die before I can take care of them.
Although not as pretty as plants grown from a tuber, many of these leaves and stems will root and can be used to grow sweet potatoes next year. Once they’ve rooted, I will plant them like I do the roots I saved.
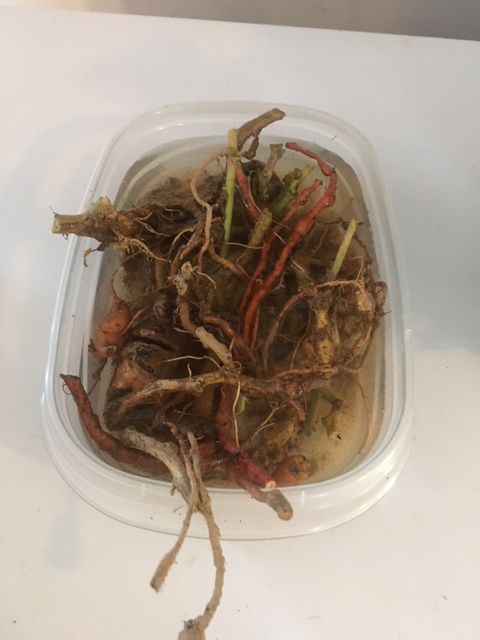
Last year, I pulled up the roots and just planted them in a shallow tray. This year I am trying something a little different. I am cutting the stems from the roots and cutting leaf segments and then placing them in water until they start to sprout roots or leaves respectively. Once they sprout, I’ll transfer the segments into soil This will not only make transplanting into the shallow trays easier but will also make it easier to plant the young plants in the garden come spring.
Once the leaves start growing on the sweet potatoes, I can also harvest the leaves all winter and eat them fresh in salads or steamed as side dish of greens with my winter meals for added nutrition. These leaves are delicious and can be eaten raw or steamed and has a higher nutritional value than the sweet potato tubers.
Try this method when growing your own sweet potatoes. I am sure that you will find that done right, you’ll have more sweet potatoes than you know what to do with them!
For more information about growing vegetables that can be stored throughout the winter without canning, freezing, or dehydrating, purchase my new book The Survival Garden!